How to Paint the Wheels on your Car
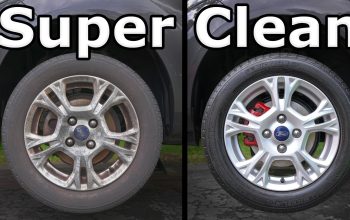
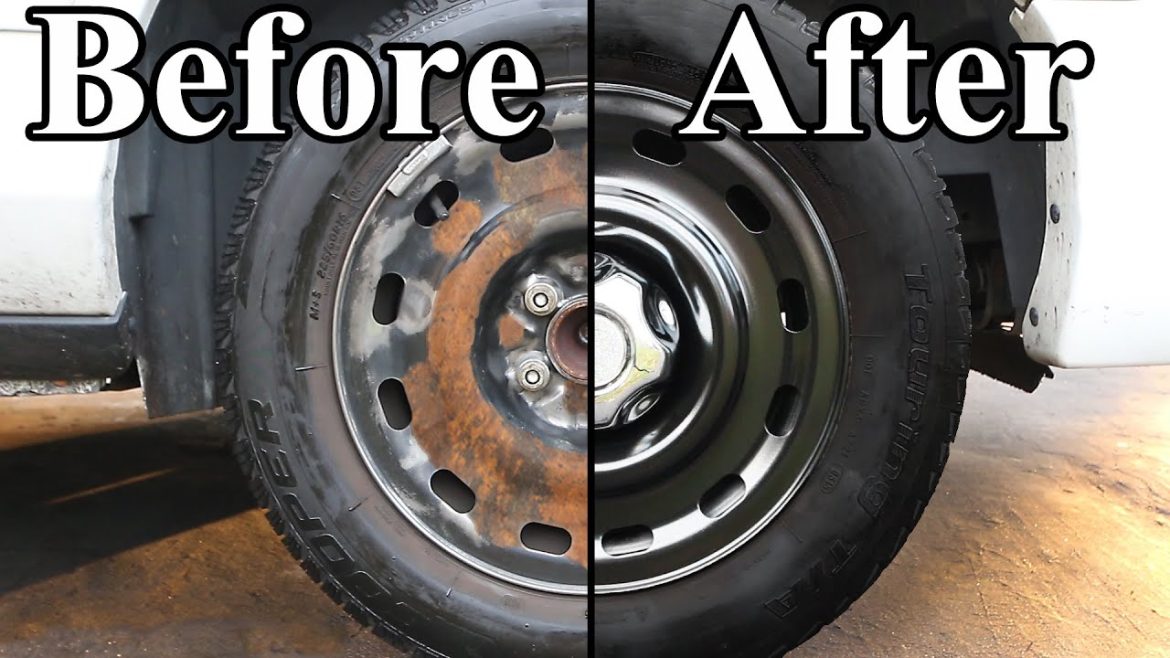
ChrisFix walks viewers through the entire process of painting steel wheels, transforming rusty, unattractive rims into sleek, visually appealing components that significantly enhance a car’s overall appearance. The video emphasizes that the method applies to all types of wheels, including steel, aluminum alloy, and chrome, and utilizes common tools accessible to most DIY enthusiasts. The process is broken down into five straightforward steps: cleaning the wheels, sanding down rust and imperfections, wiping the wheels with alcohol for a clean surface, applying primer, and finally painting with the desired color. ChrisFix provides detailed advice on preparation, safety, and painting techniques to ensure a smooth, durable, and professional-looking finish. The tutorial also includes tips on protecting tires from overspray using tire shine gel and index cards, as well as warming up spray paint cans to improve application quality. The end result is a striking transformation that not only refreshes the wheels but also elevates the vehicle’s aesthetic, with the entire job taking approximately two hours for all four wheels.
Highlights
– 🛠️ Step-by-step guide to painting steel wheels for a professional finish
– 🧽 Importance of thorough cleaning and rust removal before painting
– 🔧 Using common, affordable tools like wire brushes and sandpaper for prepping wheels
– 🛡️ Safety precautions including eye and lung protection when sanding rust
– 🎨 Tips for applying primer and paint evenly to avoid drips and orange peel effect
– 🚫 Clever methods to prevent paint overspray on tires using tire shine gel and index cards
– ⏱️ Total process takes about two hours for four wheels, including drying time
Key Insights
– 🧼 Proper Cleaning Is Crucial for Paint Adhesion: ChrisFix highlights that removing grease, brake dust, and grime with soapy water is the first essential step. Although it doesn’t have to be perfect initially, this step ensures that contaminants won’t interfere with paint bonding. Subsequent sanding further cleans and prepares the surface, but initial cleaning prevents oils and dirt from compromising the finish.
– 🛠️ Sanding and Rust Removal Dictate Final Appearance:The tutorial stresses thorough sanding to smooth out rust, scratches, and curb rash. If rust or rough spots remain, they will show through the paint, ruining the finish. Using the right grit sandpaper or a metal wire brush on an angle grinder helps achieve a smooth, rust-free surface. This step is especially important for steel wheels, which require more effort due to the metal’s hardness.
– 🦺 Safety Measures Are Non-Negotiable: ChrisFix advises wearing eye protection and a mask or respirator during sanding and grinding. This is because rust particles and metal shards can fly off and pose serious risks to the eyes and lungs. His demonstration of metal shards flying off the wire brush underlines the potential danger, emphasizing that safety gear is an indispensable part of the process.
– 🎯 Using Tire Shine Gel and Index Cards to Protect Tires: A standout tip involves applying tire shine gel around the tire edges and inserting index cards between the tire and rim to prevent overspray. The gel acts as a barrier, making it easy to wipe away any accidental paint on the tires, while the cards physically block the spray. This approach saves time and avoids the frustration of cleanup after painting.
– 🌡️ Warming Spray Paint Improves Application: ChrisFix recommends warming spray cans in hot water (90-100°F) before use. Warm paint sprays more evenly and reduces the “orange peel” texture that can occur with cold paint, resulting in a smoother finish. This simple hack enhances the quality of the paint job significantly and is an easy step often overlooked by beginners.
– 🎨 Primer Is Essential for Durability and Appearance: Applying multiple light coats of primer creates a strong foundation for the topcoat. The primer bonds to the metal, fills minor imperfections, and ensures that the color paint adheres properly. Skipping this step or applying primer unevenly can lead to chipping and peeling, shortening the lifespan of the paint job.
– ⏳ Patience During Drying and Curing Is Key: Although the entire painting process takes about two hours, including drying and curing times between coats, rushing can compromise the finish. ChrisFix’s methodical approach, waiting 2-3 minutes between coats and letting the painted wheels dry for two hours before reinstalling, ensures a durable and professional result. This encourages users to be patient and precise.
– 🌟 Final Aesthetic Transformation Boosts Car Appeal: The before-and-after results demonstrate how much a fresh coat of paint can improve the look of steel wheels. Removing rust and applying a glossy black finish completely revitalizes the wheels’ appearance, turning an eyesore into a feature. This can increase the pride of ownership and even potentially the resale value of the vehicle.
– 🔄 Flexibility and Adaptability of the Method: ChrisFix notes that while the video focuses on steel wheels, the techniques and tools can be adapted for aluminum or chrome wheels, making the process widely applicable. He also references other videos for polishing aluminum wheels, showing that this is part of a broader approach to DIY wheel restoration.
– 📲 Community Engagement and Motivation: ChrisFix encourages viewers to share their before-and-after photos on social media, fostering a community of DIY enthusiasts. This interaction not only motivates viewers to try the project themselves but also creates a platform for sharing tips and celebrating successes, reinforcing the accessibility and rewarding nature of wheel painting.
Conclusion
ChrisFix’s tutorial on painting steel wheels is a thorough, practical, and accessible guide that empowers car owners to improve the look of their wheels without expensive professional services. By following the five clear steps—cleaning, sanding, wiping with alcohol, priming, and painting—combined with safety practices and smart preparation tips, users can achieve a durable, high-quality finish that transforms their vehicle’s appearance. The video balances technical detail with user-friendly advice, making it suitable for beginners and experienced DIYers alike. The emphasis on safety, patience, and proper technique ensures the best results, while the inclusion of community engagement encourages ongoing learning and creativity. Overall, this tutorial is a valuable resource for anyone looking to refresh their wheels and enhance their car’s aesthetic on a budget.